Adobe introduced a new approach to its motion graphics workflow when it updated The Graphics workspace and Essential Graphics panel in April 2017. The new Essential Graphics panel addressed the time-consuming video processing issue that required editors to jump back and forth between Adobe Premiere Pro and Adobe After Effects.
The 2017 update to the Graphics workspace was Adobe’s successful attempt at streamlining the workflow of professional editors who work in collaborative video production environments. The final result produced a far more manageable and beginner-friendly feature from Adobe. Editors can now animate and customize titles using easy-to-access After Effects templates with no prior experience and without ever opening the After Effects app.
Creating text effects and animations in Premiere Pro
Adobe simplifies the motion graphics workflow by giving all the required tools in a single panel where you can seamlessly design and animate unique text and graphics for your videos using the supplied presets in Premiere Pro. Creating original motion effects for your clips requires a basic familiarity with the workspace. Here’s how to easily generate text animations from scratch using the Essential Graphics panel in Premiere Pro.
Choose your text

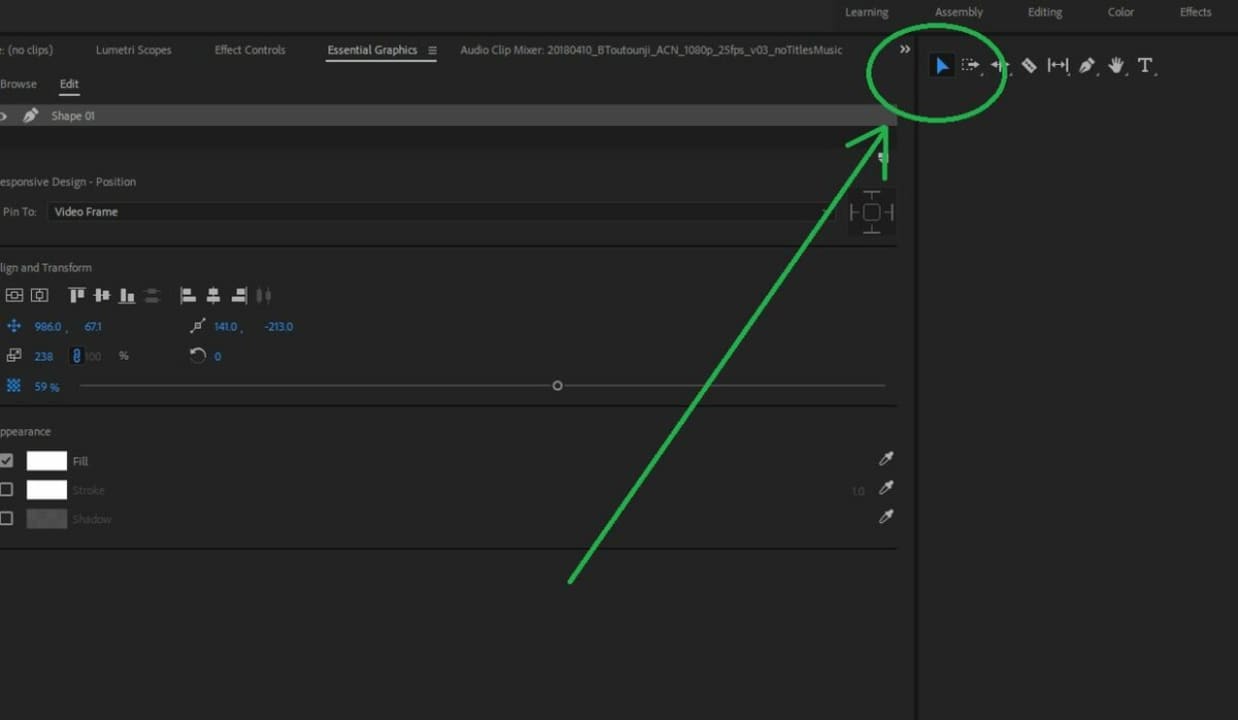
Start by clicking on Window > Essential Graphics. The next step is to use the Text Tool [T] to generate your title. Once you’ve added the text, this creates a new layer under the Editing tab. Selecting the Text layer reveals all corresponding properties and tools.
To align your text in the desired position within the frame, access this under Align and Transform. This toolset lets you choose from an array of different font styles. Click on Appearance to adjust text color or insert visual elements like drop shadow, multiple strokes, and responsive background.
Select your background elements
For your background, start by creating two Rectangle layers. Click on New Layer beside your existing at the top of the Essential Graphics panel. The rectangles should significantly outsize your text. The larger asset gives you enough room to crop and add masking later.
To change the color of your rectangles, navigate to Fill in the Appearance at the lower right of the panel. Choose your colors by checking the box next to the background options. Now, you can arrange your layers. Put one color at the top and the other at the bottom. Now, position the text at the top.
Mask your graphic
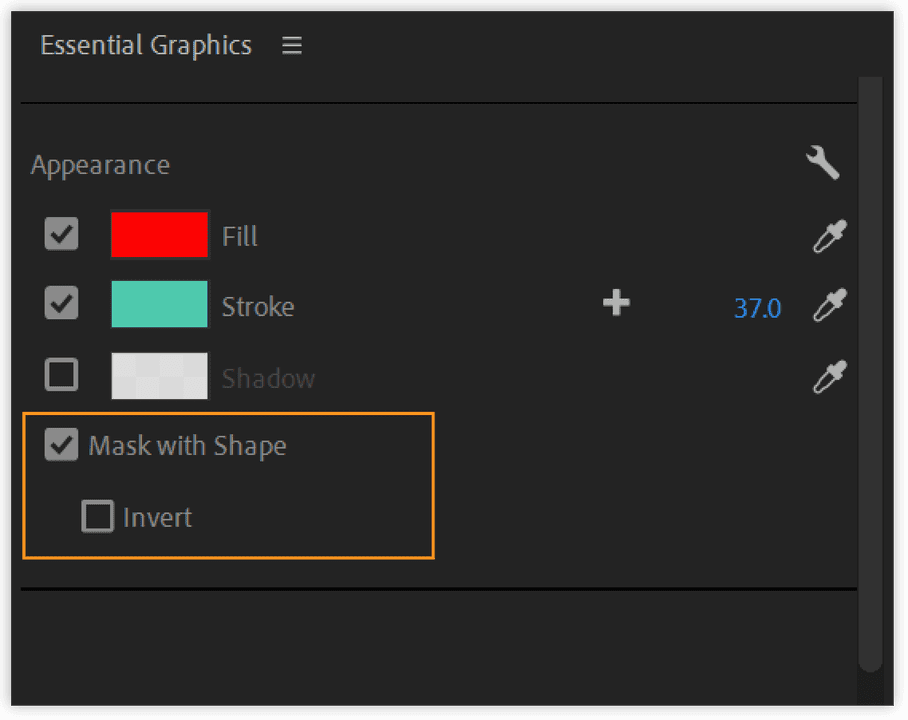
Adobe introduced masking to the revamped edition of the Essential Graphics panel, making this feature accessible directly in Premiere Pro. Before adding a mask, you need to create a new layer for your rectangular shape. Size and position the shape as desired, and then, select the Mask with Shape under Appearance, located at the bottom right.
If you are working with several layers, the Graphics panel gives the option to group them so that the mask applies to each layer. Now, you’re ready to animate your graphic.
Set your background and text in motion
Once you have arranged all the elements by following the steps above, you can now animate your text and backgrounds following a simple approach called the Y Position shift. Start by animating the text layer.
Animate the Y Position by moving the Playhead over the two-second mark in your timeline. This times the animation over two-second intervals so that one color appears first, followed by the second color.
Now that you’ve established where the animation ends, choose the Text layer on the panel before selecting the Position icon under Align and Transform.This step turns on the animation and adds a keyframe at the time indicator. Verify the motion effect is applied after the symbols turn blue.
At this point, you can bring your playhead to the one-second mark. Now, adjust the Y attribute to put your text in the appropriate starting position within your timeline. Any time you make changes to a given attribute, a new keyframe generates, adding itself to the location. Now, you can animate both of your rectangles by following the same steps. Be sure to offset the time for each shape to produce the desired effect.
Customizing video titles is simple with Premiere Pro
With its seamless drag-and-drop interface and preset animated texts in one panel, finding the perfect look for your video titles couldn’t be easier in Premiere Pro. The software comes equipped with several advanced features to help you create stunning, professional-grade videos. For more on color-correcting night videos, check out our Premiere Pro latest tutorial.